

Last Updated:June 24, 2026
Sunroom Flooring In Depth- (Everything you could want to know)
Are you thinking of adding a sunroom to your home? We’ve written a full guide discussing the primary flooring options for your sunroom addition. We’ll cover the advantages and disadvantages of each as well as some sunroom structural flooring cost considerations. We will also discuss the options for the homeowner facing floors.
The three most common options for sunroom structural flooring are:
- Concrete Slab
- Preexisting Decking
- Crawl Space
Concrete Slabs as Sunroom Flooring
Concrete slabs are the most popular option for a structural floor for a sunroom. They concrete slab could be one that is already poured for an existing patio or one that is laid completely fresh as the foundation of the sunroom.
The slabs offer are popular because they are a very cost efficient solution. Residential slabs are normally 4″ thick, and the price will be around $6 per square foot. This means a 10’x12′ room would cost $720. This is a fraction of the cost the homeowner would pay to build any of the other options.
If you are concerned with stability, there are options for a thicker slab. Some homeowners choose to go with a 6″ slab which adds roughly $0.50 per square foot. Alternatively, there are some meshing products that can be placed which will provide even further stability.
These are something to be considered if you are looking at using the sunroom as a home to a large hot tub or other very heavy items. For reference a 6 person hot tub has roughly the same weight as TWO Toyota Camrys.
Concrete is also resistant to mold and mildew. Slabs are very low maintenance sunroom foundation that will last more than a decade.
The primary drawbacks are the slabs are only an option for homes that are own the ground level. This isn’t really an option for any home with an elevated backdoor and existing porch area.
Second, the slab can be cool to the touch meaning that you will want to put some type of interior flooring over it. This could be as simple as area rugs, carpeting, but the sunroom will feel unfurnished if you leave the entire area open.
Third, concrete can be an impediment to reaching water, sewer or electrical lines under the home. Anything that is under ground after the slab is set will largely be inaccessible. There are some options for opening a part of the slab foundation, but that is pretty far outside the purview of this post and is absolutely something we would not want to see a DIY homeowner take on as a project.
If a problem does arise under the slab, this is going to be more costly than any of the other options. For most homeowners, this is an acceptable risk because these type of issues are not the most common.
Preexisting Wooden Decking as Sunroom Flooring
The second most popular option for a sunroom structural floor is to use an existing wooden deck as the support for the sunroom. If you are going down this path, we recommend hiring a construction professional to ensure the additional weight of the sunroom can be supported with the existing structure.
The existing deck may require additional posts or joists. It may also be necessary to upgrade the type of fasteners like nails or screws. There is a huge difference between the weight of some patio furniture and 4-5 people that may be 1000 pounds compared with what would be present in a sunroom. The weight of the raw materials could weight more than a 1000 pounds before you add any people or furnishings.
The weight really starts going up with any snow accumulation. Wet snow weighs 1.66 pounds per square foot. This means that three inches of snow on the roof would add 717 pounds to the overall structure.
Another factor for existing wood decks is that they are more susceptible to mold and mildew damage. A lot homeowners use a sunroom as a place to grow plants so you will want to be careful when watering plants.
You will also want to check the underside of the deck at least once per year for any mold or mildew. The moisture from the sunroom can get into the wood structure which will cause damage.
Another option is that wood structures will expand and contract throughout the year depending on a variety of factors. For this reason, you’ll want to ensure that you are only using pressure treated lumber that is appropriate for this type of project.
A small deviation in size will have minimal impact on an uncovered wood deck. This is not the case once walls, windows and the roof are added.
The two main reasons that people go with an existing wood deck are that the home is elevated making a concrete slab out of the question. The second is that they either have the full deck built or at least a portion that can be extended at a less expensive price than starting over with a different option.
If you go with a wood deck as a structural flooring for the sunroom, you will want to make sure there is at least 18″ off the ground clearance. This needs to be unobstructed so no lattice, plants or other items that would block the air flow.
Wood decks really need the fresh airflow to avoid getting mold or mildew. To protect the underside of the deck, we recommend using a mold resistant spray. This is something that can used every third month or so. This is the case that 10 minutes work and $10 can save hours of work. We’ve included a link to our favorite mold blocker:

- MOLD ARMOR Mold Blocker is waterproof and prevents mold growth for up to 3 months.
- This mold blocker creates an invisible barrier to prevent mold growth on indoor and outdoor surfaces.
- This anti-mold spray is for use in bathrooms, linens, draperies, fabrics, apparel, carpets, bedding, upholstery, and furniture.
- To use, spray surface until wet. Allow to air dry.
- Repeat every 3 months on fabric surfaces and every 7 days on hard, non-porous surfaces. Follow all directions carefully.

There are plenty of mold removal companies that will be able to handle a mold or mildew outbreak, and this is something that I strongly suggest turning over to professionals. On that vein though, mold damage may be covered by your homeowner insurance.
For us, the initially declined our claim; however, we worked with the mold removal company on how it was coded and they were able to work out an arrangement with our insurance company to cover everything beyond our deductible which saved us more than $2,000.
Crawl Spaces as Sunroom Flooring
A crawlspace is a wooden structure built slightly above ground. This needs to be at least 18″ above ground, and it’s crucial that you don’t restrict air flow. Because the space underneath is so much lower than a deck, you may want to take further precautions to avoid mold or mildew.
Additionally, a crawlspace that is less than 18″ can result in premature rotting. When you are insulating the crawlspace, you will want to use spray foam rather than saturated roll insulation. The reason is that the roll foam will lose all its R value when it gets wet. Furthermore, this roll foam is an ideal location for mold to grow.
Spray foam is something that can be dangerous to use. We recommending following all the manufacturers safety guidelines which include wearing safety goggles and gloves. Spray foam is relatively inexpensive for the value it adds by lowering the heating and cooling bills for rooms connected to the HVAC system.
Three seasons benefit from having insulation because it will allow the room to be used more days. It will also make lower the extreme ends of the temperature scale which is important if you are going to use this as a home for pets or plants.
This concludes our summary of the main options for structural flooring for sunrooms. Once you’ve laid the structural floor, it’s time to decide what will be placed on it.
Bare Floors / Area Rugs for Sunroom Floors
The first option for an interior floor is to leave it bare with strategically placed area rugs. This is the most budget friendly option, and it works great for any of the options above.
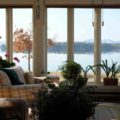
We are especially fans of this if you are going to use the sunroom to hold a hot tub or as a solarium to mainly grow plants. The bare floors will make cleaning up any spilled water or soil much easier than other options. You also don’t have to worry about fading from sun.
The bare floors also offer a plethora of cleaning options. Furthermore, it is possible to change the entire décor of the room by simply replacing the area rugs. Some people will change the rugs with each season to create a different feel in the room. The different colored rugs will also accent the exterior foliage making for a relaxing room that wouldn’t be possible with more permanent flooring options.
Some people don’t care for the feel of exposed concrete slabs. They can feel cold to the touch especially during the winter months.
Area rugs are very cost efficient at $1 per square foot. Additionally, the entire room doesn’t need to be filled end to end with area rugs as some open spaces are totally acceptable.
This means that a homeowner could own three entire sets of area rugs for the price of a single carpet installation which is the next most budget friendly option.
Carpet
Carpet is a very popular choice for many homeowners. It is great for cooler climates because it will greatly mitigate the cool to the touch feeling of any exposed concrete.
There are a variety of carpet options, but we strongly recomend Olenfin fiber carpet. This is a type of carpet rather than a brand. Olefin was invented in 1957 by Giulio Natta who later went on to win the Nobel prize. (source )
Olefin fiber carpet are not the old green bristle feeling outdoor carpet you remember from the 1980s. This carpet can feel lush lush, and there’s far less difference to the touch than traditional interior carpet.
Olefin fiber carpet is stain resistant. It does not grow mold or mildew easily. Because this type of carpet is chemically inert, it can also be cleaned with diluted bleach water without worry about being discolored.
Carpet can be nailed to wood decking, and it also has a solid rubber back that can be glued to a concrete slab.
This type of carpet will cost about $3 per square foot. We’ve installed carpet in a many homes over the years, and Home Depot/Lowe’s have always come in at higher quotes than smaller flooring dealers.
The big bog stores offer a convenient shopping experience, and there is an expected level of quality. But you are definitely paying for this service. Conversely, we go with smaller flooring companies that have good Yelp reviews.
In 2016, we added new carpet throughout our entire rental home, and we were able to save more than 60% by choosing a small independent company rather than going with the quotes from Home Depot or Lowe’s.
Luxury Vinyl Planks for Sunroom Floors
Luxury Vinyl Planks (LVP)are all the rage on HGTV. It seems like every home remodeling show uses this. It has the initial impression of a high end wood floor at a fraction of the cost.
LVP will cost $5 per square foot. $2 of this will be material costs with $3 being labor. For this reason, it’s an amazing option for the DIYer. If you are comfortable installing LVP, the price will be less expensive than carpet. It also doesn’t require any special tools. We’ve included a video below of someone installing Luxury Vinyl Planks.
LVP is also more neutral and can be decorated with area rugs to accent colors.
The only drawbacks to LVP are it won’t be as warm as carpet in cooler environments. It may also be slippery if it gets wet so because careful the dry it of you spill from water plants or have an overflow from a hot tub.
Vinyl Sheets for Sunroom Flooring
Vinyl are very similar to linoleum. The primary difference is the material which the sheets are created, but the average person walking on the floor won’t be able to tell much of a difference. Linoleum was a popular product in the 1970s and 1980s as a budget flooring that is easy to clean.
The technology for stain-resistant and fade resistant carpets was nowhere near where it is today. As such many people gravitated to the vinyl sheets. Furthermore, vinyl planks weren’t an option in those days so it’s very possible that if your sunroom was built back then that you would have this type of flooring.
I would consider vinyl sheet flooring to be “functional”. If you are going to install new flooring then, there are better options for nearly everyone. However, if you have an installed vinyl sheet for that is in good condition, there’s no need to go through the hassle and cost of replacing it.
The drawbacks to vinyl sheets are that they are difficult and costly to install. If the sheet rips or tears, it is not easily patched. I’ve seen patched vinyl sheet flooring, and I’ve never seen it done well.
The sheets can bubble up or create small rolls if the structural flooring moves. This is an especially bad combination when it is placed on either wood decking or crawlspaces.
Overall linoleum and vinyl sheets just feel dated.
Due to all these drawbacks, we do not recommend vinyl sheets for any new project. We don’t recommend replacing a linoleum floor that’s working, but it just not something for new projects.
Ceramic Tiles for Sunroom Floors
Ceramic tile is a fantastic option for high end homes. They are also a favorite home upgrade for skilled DIYers. I had a good friend who would purposefully buy homes that had dated carpet or vinyl sheet flooring that he could upgrade to ceramic tile.
There were a list of 5-6 projects he would do around the home to increase it’s value, and then he would sell the home after owning it a couple years at a good profit. He had climbed the property ladder by using this technique to being mortgage free in his 30s.
Ceramic tiles have a great property of absorbing the sunlight and converting it to energy that is slowly released over time. Ceramic tile can also be sealed to be resistant to stains and fading.
The real draw for DIYers is that the material is roughly $5-10 per square foot whereas the labor is $10+ per square foot. This means that if you have the ability to do the labor you can add significant value with this upgrade.
Furthermore, it really lifts the overall quality feel of the home when the bathroom and kitchen floors are ceramic tile. If you are someone who wants to learn tile work, a sunroom can be a great way to get your feet wet before moving to a harder room that with plumbing features that will require more cutting.
Laying ceramic tile does require some specialty equipment. A tile saw can be rented from Home Depot or Lowe’s, but if you are doing tile work we highly recommend picking up a tile saw. We’ve included a link to our favorite tile saw below. This costs less than $90 below. For reference, you can rent a tile saw from Home Depot for one day at $31 so it’s cheaper to just buy a tile saw than to rent one for three days.
Also, if you decide that laying tile isn’t your thing, some stores offer refunds on the tile saw. So purchasing the saw is just a win either way. If you like doing tile work, then you have the tool that you can use for many projects, and if you realize you don’t have the expertise to take on this project the saw may be able to be returned.
Because installing ceramic tiles can feel intimidating, we’ve included a video of someone adding tile to their laundry room. We really like this video because it shows a homeowner going through all the steps of upgrading their existing floor to tile.
This is a real video where things don’t go smoothly, and I’ve found it to be the most helpful video to beginners on the topic of installing ceramic tile.
Remember, when you are installing a tile floor, it’s important to have a moisture barrier between the tile and the subfloor. This will lower the impact of the materials expanding and contracting at different rates. It will greatly decrease the amount of cracking in the tiles, and it will lower the chance of buckling.
I really enjoy the linked video because he goes over all the steps and explains why each part is done.
Wrapping up
So that’s our thought on flooring for sunrooms. If you have more questions about a different topic, we’ve created an exhaustive guide to sunrooms. (Source).
Also, we love hearing from your readers. We are first and foremost a community of makers and homeowners who enjoy DIY projects. Have you added a sunroom to your home? If so, we’d love to hear the project went? Are their other questions that you’d like to see what our community thinks?
Ultimately, our goal is just to create posts to be educational and entertaining to our readers, and I want to conclude by thanking you for visiting our site.