Last Updated:May 24, 2025
How to insulate a sunroom (Options for new builds and existing rooms)

This guide will walk through how much insulation homes may need when they convert their patio into a sunroom or add new covered patios to their existing homes.
Homeowners should be aware that adding on a sunroom or patio will affect the amount of heat loss through the roof, which can have an effect on overall energy consumption. A family might not notice the difference in the summertime because they are using other sources of temperature control like air conditioning or fans, but in the winter, without proper insulation, they would see an increase in energy usage.
Before I dive in, I just wanted to remind our readers that we are average people who enjoy DIY home improvement projects. This post is meant to be a guide for general educational and entertainment purposes only.
If you are looking to make an addition to your home, I strongly recommend hiring a professional to help you with the exact specifics of your individual project. Whether they do the work or simply help you plan out the project for you to complete the room as a DIY project, it’s imperative to have answers for your precise local and home.
Do you need insulation in a sunroom?
There are two main type of sunrooms. The first are “all season rooms” that have some form of heating and cooling. In order for the sunroom to be counted as part of the total square footage for the home, it must have some type of heating and cooling.
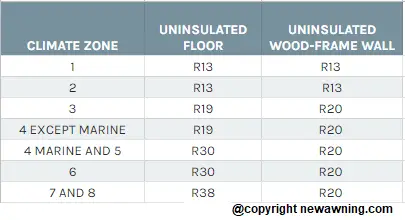
Obviously, any room that you are going use energy to either heat or cool, you will want to put some form of insulation. Furthermore, the room will also have to meet the current building codes for the area that you live. We’ve got a chart from the energy department along with their high level list of insulation for walls below.
For “thee season rooms”, we also still recommend insulation. Because these rooms are only designed to be used for 9 months of the year, they don’t have a system to heat or cool the entire room.
For reference, some people will still use a ceramic heater or a window air conditioner to modify the temperature; however, they won’t be integrated into the home’s HVAC system.
We recommend three season rooms also have insulation. There will be less regulations form a building code perspective, but you don’t want to have a space that works as a heat sink for the whole home.
If you choose to save money now, the fact it’s not insulated bay be a deal breaker when you try to sell the home.
How much does it cost to insulate a room?
A professional will charge between $600 and $1800 to insulate a sunroom will cost depending on the size of the room, and what type of insulation you choose.
The project is divided roughly evenly between material and labor costs so if you are capable of installing the insulation as a DIY project, you can cut the cost by roughly half.
How much insulation is required?
Insulation is measured in ‘R-value’ with higher being better. Data and maps are based on images from energy.gov
- Drywall 1/2″ – 0.45
- Drywall 5/8″ – 0.56
- Plywood 1/2″ – 0.62
- Plywood 1″ – 1.25
- Brick – 0.8
- Concrete 1″ – 0.52
- Vinyl siding – 0.61
- Aluminum siding – 0.61
- Single Pane Windows – 0.91
- Double Pain Window – 1.69
- Rigid Foam Insulation – 10
- Pink Fiberglass Roll – 13 **We do not recommend using this product


Why we don’t like Pink Fiberglass insulation for sunrooms (or garages)
Pink batt insulation is normally a great, cost efficient solution for DIY home owners to add increase the R value of their home. Using it does require safety gear, but it doesn’t require significant experience or costly specialized tools.
The pink roll insulation does well in attics or walls that will collect little condensation. The insulation doesn’t handle getting damp. This can lead to cracking and may greatly lower the R value protection.
Because sunrooms famously draw so much condensation, it is a near certainty that the insulation will get soaked. This leads us to have strong opinions against using it when building out a sunroom.
Why use like Rigid Foam Insulation for Sunrooms and Basements
The windows from the sunrooms draw in a lot of condensation, and the concrete from basements will pull a lot of moisture to the insulation. Rigid foam insulation is air tight when applied properly meaning that it will create a moisture barrier between the exterior walls and the interior walls.
As such, this is going to greatly reduce the likelihood of getting mold or mildew. Furthermore, rigid foam insulation won’t break down when it gets exposed to water. For these reasons, we always go recommend going with rigid foam insulation for sunrooms and when finishing a basement.
Why use rigid foam insulation over spray foam?
We love spray foam, and we are taking nothing against professionally installed spray foam. This article is mainly geared towards people who do DIY projects around their home.
I don’t think anyone would suggest that an amateur homeowner should ever do a foam spray insulation for an entire wall. Large scale spray foam requires training, special tools, and head to toe protective gear.
How do you attach Rigid foam insulation to the exterior walls?
There are two ways to attach rigid foam insulation to exterior walls. The first is to use screws with caps. The second is foam safe adhesive. We prefer the second option, and our favorite foam safe adhesive is:
- Designed For Foamboard: Specially designed for permanently bonding foamboard insulation to a variety of interior or exterior surfaces
- Versatile: Strong, durable bond to all foamboard insulation products, as well as wood, gypsum board, concrete, brick, and more without burning through foamboard
- Quick and Easy: High grab reduces the need for fasteners and formula, sets in just 20 minutes and fully cures in 7 days
- Low VOC: Latex water-based adhesive with low VOC emissions and meets strict federal and state guidelines
- Weatherproof: Resistant to water and weather for a strong, durable bond to multiple surfaces
Can you insulate an existing sunroom?
Yes, many sunrooms are converted patios that have little to no insulation. Rather than taking down the interior drywall, you could hire someone to use injection foam into the walls.
There are two ways to inject the insulation. The first option is to drill the holes from the exterior. This is a great option if you have vinyl or aluminum siding on your home. The contractor can remove one piece of the siding to get access to the boards underneath. They can drill the holes in this to spray the insulation, plug the hole, and simply replace the piece of siding they took down.
For brick homes, they can drill holes through the mortar. Because the holes will be smaller they will need to drill more holes, but afterwards the foam is injected they will be able to reseal the hold with mortar.
For homes with a decorate wood exterior, it may be more suitable to go from the inside. The contractors can drill through the drywall to inject foam this way. After all the foam is placed into they holes, they should also patch the holes and apply the first layer of mud.
The downside of going from the inside is that you will need to repaint the spots on the drywall that were drilled through.
Wrapping up
So that’s our guide to insulating a sunroom. I hope you’ve found this article helpful. We’ve written a full guide on sunrooms, and we love hearing from our readers. Do you have a sunroom? If so, what projects have you done with it?


