Last Updated:June 12, 2026
How to create an outdoor theater with a sail shade
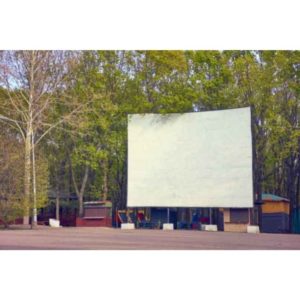
Sail Shades are more than just a way of blocking out the sun. You can use this nifty outdoor invention as a screen for your TV, projector & laptop and watch movies on it.
When I was in my twenties, we had a group of friends that had a BBQ and group movie night each Friday evening. We’d head over to his house and each bring a lawn chair to sit in his backyard.
He had a projector that on a folding card table that he put in his yard and pointed it towards the home. He had a 8’x10′ white sail shade that hung from the side of his home. It was a perfect fit because the fascia already had the hooks when he used it as a sun cover.
Although to be fair, if it was raining or a storm, we’d find another activity to do. It just wasn’t safe to run an extension cord for the projector in the middle of the rain storm. Regardless, those movie outdoor movie evenings were huge fun for us, and I wanted to share that experience with the readers.
What you’ll need to make an Backyard Movie Theater
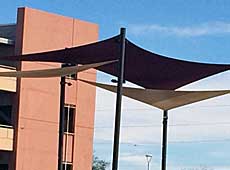
If you already have a sail shade attached to your home, this will be very easy. You simply need to get a white sail shade like. I really like this one because it is a thick fabric so the movie will show up better.

- 【UV PROTECTION & COOLING】This sunshade sail is made of 200GSM high-density polyethylene (HDPE) fabric with UPF 50+ sun protection factor, providing cooling effect of 10-15℉ and protecting furniture and swimming pool areas from direct sunlight.
- 【BREATHABLE & DRY】The permeable weave lets air flow through tight porch corners easily. Rainwater flows right down without pooling on the fabric surface, preventing heat buildup and stuffiness.
- 【STRONG & STEADY】The shade sail features curved edges and thickened stitching, ensuring both aesthetics and enhanced tensile strength. Each corner is equipped with a stainless steel D-ring for stable hold, even in strong winds.
- 【EASY SETUP】Easily hang this sail on any structure. Low maintenance and easy to store, making it flexible choice for backyards and carport.Leave 0.5-1 ft for installing hardware to achieve optimal tension. Hardware kits help ensure stable setup (hardware kit not included).
- 【CUSTOMER CARE】As a direct manufacturer, we stand behind our craftsmanship for three full years. From small balconies to large sports facilities or outdoor restaurants, we can customize to achieve the perfect fit.Your satisfaction is our commitment!

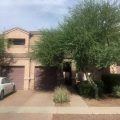
If you don’t have a sail shade on your home now, you need to install the hooks to your home or whichever place you want to use to support the screen. I’ve created a full guide of all the ways to attach a sail shade to your home.
Once the sail shade is attached to your home, I recommend using some one gallon water jugs as the anchor. You simply need to tie some rope between the D ring in the lower corners and the jug of water sitting on the ground.
If you want something a little more professional looking than the water jugs, they make tent weights. These are used at the base of popup tents around the leg to stop from them from flipping on windy days. Here’s a link to our favorite tent weights

- 【High Quality & Durable Materials】Made of high-quality PE, the canopy weights are sturdy, wear-resistant and not easy to crack. In addition, due to the excellent blow molding process, our weight plates also have good weather resistance, which can prevent fading and aging caused by sun and rain.
- 【Water/Sand Filling for Reliable Fixation】Each weight plate has a large diameter injection spout for filling with water or sand to increase weight. Even on windy days, your tent, pop up canopy or patio umbrella can be securely held down in place without being blown over. Note: The canopy weights you received are empty, please add weights by yourself, using sand or water.
- 【Easy to Install & Stack】Featuring no-pinch design, these weights are safe to install without hurting fingers. The open slot fits all canopy poles up to 1 1/4” wide, all you need to do is simply slide the weights onto any canopy leg. It’s also worth mentioning that the male-female interlocking design allows the weight plates to be firmly stacked to enhance wind resistance.
- 【Suitable for Various Occasions】Compared with the bulky concrete bases and unsightly sandbags, our weight plates provide a more stylish look while ensuring excellent stability. You can use these weights on any occasion with canopies, such as trade shows, picnics, parties and other outdoor activities.
- 【Easy Carrying & Transportation】Our four-piece weight plate kit weighs only 3 lbs in total when empty, so it can be easily moved from one place to another. In addition, an included strap prevents the stacked weights from scattering while making them easy to carry and store.
Once the screen is all setup, you will need a projector and an outdoor extension cord. We purposefully chose a 50′ extension cord because we ran it around the outside of the yard. Remember, it will mainly be dark except for the light from the projector, and you don’t want you or one of your friends tripping over the cord.
We’ve found the best place to get outdoor extension cords to be at Walmart right after Christmas. Because they are in such demand for holiday lighting, the store stock up on their outdoor extension cords. Each year after Christmas, there are always unsold cords that go on sale, and this is the ideal time to pick some up.
I do not recommend buying extension cords on Amazon, Home Depot or other stores out of season unless it is absolutely necessary. As of today, a 50 extension cord at Home Depot more than $15. I’ve included an image of today’s pricing below.
After Christmas, we were able to pickup this same type of 50′ outdoor extension cord for less than $4.99.
When it comes to projectors, this is going to make a huge difference. There are two approached you can take. If you live in a rural area without a lot of ambient light from passing cards, street lights or your neighbors, you can go with an entry level projector. The bulbs don’t have a lot of lumens meaning that they won’t be able to really illuminate a the screen if they are competing with a lot of other light sources.
We mainly use our budget projector for watching movies in a room with full blackout curtains. This stops all external light from entering the room, and the projector is more than enough for this type of setup.
We also have a more expensive projector that we use for either outdoor viewing or in our main living room if we want to host a football party. This projector cost 8x as much as our other projector, and the bulbs are far more expensive.
We’re a pretty thrifty family so we limit the time this projector is being used to maximize the lifespan of the battery. Another downside of the expensive projector for outdoor use is that you don’t want to accidentally drop it or have someone trip over the cord pulling it off the table. The batteries for the good projectors will cost several times more than the total cost of the our primary use projector.
To play the movies on the projector, we use an Amazon firestick. Our router covers our entire backyard so a firestick is the perfect solution. We simply plug it into the HDMI port of the projector, and we have all the movies outdoor that we’d have access to inside.
When we did this when we were younger, we’d rent DVDs from Blockbuster, but with the prevalence of streaming, I can’t imagine anyone is going to need to know tips on that.
Creating Audio for your Backyard Theater
For this, I highly recommend using some gaming computer speakers or blue tooth speakers. Because you are outdoors, there won’t be a lot of surfaces for the sound to bounce on. This means you will need to keep the sound at a much higher volume than you would inside. I strongly recommend getting some high quality speakers.
Remember, you need something that is easily mobile so I don’t suggest large speakers or any type of sound bar. These aren’t designed to be mobile so you need something that can easily be moved outside during the parties and stored inside without taking up huge amounts of space.
We’ve been very happy with our Logitech speakers over the years. I have them for my primary computer and for our daily use projector. I’ve included a link to the Logitech speakers that we have.

- Versatile setup with speakers that connect easily to computers and other devices via Bluetooth wireless or 3.5mm cable
- Logitech Easy-Switch technology lets you seamlessly switch between audio devices Just by pausing the Audio on one device and pressing play on the other
- Each speaker has one active/powered driver that delivers full range Audio and ONE passive radiator that provides bass extension.
- On-speaker headphone jack Plus convenient controls for easy access to Bluetooth wireless pairing, power and Volume adjustments, Bluetooth version: 4.2
- Works with Bluetooth enabled devices and any device with a 3.5mm input including a computer, television, smartphone, tablet and music player
Storing the Sail Shade Movie Screen
When you are not using your sail shade as a movie screen, I recommend taking it down and storing it in a safe dry place inside. This will help keep it’s white color longer, and it will make it far less likely to develop rips or tears.
While you can patch a sail shade that is being used for protection from the sun, when you are using it as a screen, you will want as pristine fabric as possible. Any dirt or smudges will appear on the movie. Sail shades can be cleaned with the right cleansers, but it’s easier just to keep it up while not in use.
If the shade gets a tear or rip, it’s just done, and you need to replace it. The ways of mending the shade will be exaggerated when they are hit with the light from the projector. Whether they create uneven parts of the movie, shadows or other blemishes, it will be annoying to anyone trying to watch the movie.
Wrapping Up
Have you ever created a backyard movie theater? If so, what did you use? How did it turn out? We’d love to hear from you. We would love to get some images from our readers if you have taken pictures at your events. You can reach us at our contact form or via our twitter account @newawning.