


Last Updated:July 12, 2026
Sun Shade Posts — What to look for

Installing a sail shade post is a great way to add value to your home, and it’s easy too. You can install one in an hour or two with just a few basic tools. In the following article we will show you how to do this, step by step.
In this post, you will learn the best post material, shape, DIY options, placement and how to set the hole.
Sail shades are a great, cost effective alternative to awnings. They can either be attached to the house or atop a support post. If you go with the latter, we suggest reading this article to have the best experience choosing and setting up the post.
Options for Post Material
When it comes to support poles, there are two main types in the US. Those are a treated wood beam which is normally a square 4″x4″ piece of treated lumber. It’s very important for it to be weather treated, but we’ll cover that more in the dedicated section for wood beams.
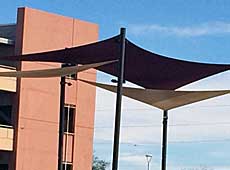
The other material is metal. This will vary between aluminum or steel. In most cases, it would be a steel tube. At the very least, we recommend stainless steel. Both galvanized and powder-coated steel poles will last even longer.
For round steel tubes, we recommend a diameter of 90 millimeters or 3.5 inches, and for square steel tubes we recommend each side also be 90 millimeters or 3.5 inches with a wall thickness of 3.5 mm (Source)
For the vast majority of sail shade installations, we recommend:
This is a very strong pole that will last for more than a decade. It also requires very little maintenance to keep it in good working order.
If you are a DIY, then we highly recommend only considering wood beams. We’ve heard stories of people that used a metal pipe as a support pole, and while this is a cheaper option, they are not designed to support load in this fashion. You really need to look for a tube with thicker walls. This is measured by the tube’s gauge. The absolute minimum we recommend is 3.5mm which is just around 1/8th of an inch.
What Sun Shade Post Shapes are Available?
Since most people simply use a support pole, the metal tube is the most common, and these are always round. I strongly prefer metal poles so that I don’t need to worry about getting the corners parallel so that everything looks straight.
If you are using wooden supports, I highly recommend using a chalk line to ensure you are aligning the corners. I’ve seen some incredibly amateurish looking installs where the homeowner didn’t think about this until they had already set the concrete. If you make this mistake, it will lead to the shade always looking off.
What Dimension should I look for in a Sun Shade Post?
For wooden poles, we suggest going with a 4″x4″ for anything smaller than a 10’x10′ canopy. Anything larger than this size, we prefer going with a metal pole. Remember, the fabric acts as a sail during strong winds so it can create a large amount of force.
For metal poles, we’re looking for a 3″ diameter with a wall thickness of 13 gauge. When dealing with gauge, please remember that lower numbers means thicker walls. The chart below shows the sizes, and the ones in green are good for being a sail shade support pole.
For metal poles, we’re looking for a 3″ diameter with a wall thickness of 13 gauge. When dealing with gauge, please remember that lower numbers means thicker walls. The chart below shows the sizes, and the ones in green are good for being a sail shade support pole.
- 10 gauge = .134 inches
- 11 gauge = .120 inches
- 12 gauge = .109 inches
- 13 gauge = .095 inches
- 14 gauge = .083 inches
- 16 gauge = .065 inches
- 18 gauge = .049 inches
- 20 gauge = .035 inches
Install the Sun Shade Pole at a 5 degree angle for maximum support
Another tip is to install the pole at a 5 degree angle sloping away from the center of the sail shade. We are just home owners, and I’ve found it easier to simply install the poles perpendicular to the ground.
The professional guides I’ve seen recommend installing it at the 5 degree slope because it will provide extra support to the shade.
I’ve seen shades installed both ways over the years so it can be a matter of personal preference. I feel it’s a trade off between the ease of using a plum bob to the post completely vertical or using more tools to get the 5 degree lean. (Source)
How deep do you dig a hole for a sail shade post?
The depth is going to vary on many factors. It is impossible for us to give a blanket answer that would work because the ground is so different. What may work in a hot desert climate like Arizona with it’s sandy soil and very little precipitation is going to be very different than what someone in Maine or Washington would need.
Since this is far outside the realm of our expertise, we are going to tell you how we handle this as home owners. We head over to our local home depot store and ask go to their ‘Pro’ department and ask them.
During normal business hours, Home Depot has skilled craftsmen who can help you determine the depth and size of hole you need for your individual project. It should also go without saying that a small 6 foot triangular sail shade would need a vastly different hole than a large 16′ x 16′ rectangular shade.
While you are at Home Depot, it’s also a great place to pickup the concrete that you’ll want to use for the post installation. The service people there will be able to give you advice on how to have the best results in your local area.
Additionally, we’ve found that Home Depot is far more cost efficient for buying materials like weed killer and concrete over the online stores.
We’ve been recommending people chat with the ‘Pro Desk’ at Home Depot for years, and we’ve yet to hear a report that anyone was turned away without getting practical, useful advice.
Wrapping Up
This guide is a work in progress. As we get more questions from our readers, we’ll continue to expand this post. As I mention frequently, we are just average homeowners who like doing projects around the home.
I am not a licensed contactor or awning installer, but rather someone who does a rather someone who shares my experience as an ‘Do-It-Yourselfer’ with moderate skill.
If you have any questions or suggestions for this post, we’d love to hear from you either at our contact form or at our twitter account.