

Last Updated:July 05, 2026
How to Repair your Awning
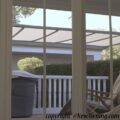
Source: Image Taken at Phoenix, AZ mall
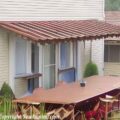
Quality built awnings are designed to last for years; however, over time the various components can malfunction leading them to need repair. When possible it is best to replace the individual piece that is damaged rather than remove the entire unit and replace with a brand new one. Simply fixing components can be substantially cheaper for both labor and material. Our guide below will explain how to deal with each aspect of a damaged awning.

How to repair torn awning fabric
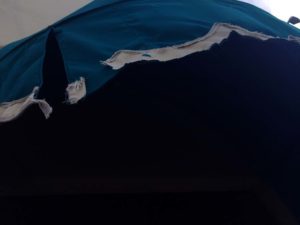
Heavy winds can lead to tears in the awning material. This is the most common problem, and it is rather easily solvable when caught early. The key is to keep the hole as small as possible and to halt any further breaking down of the material. If the awning is a cloth based material such as the coated heavy cotton material, then you will need to fix this with some fabric. The first step is to measure the gap in the awning and then add about six inches on all sides. The distance may need to be a little larger for especially large holes in the fabric, but the six inches is a good baseline guide for most holes we see. With the measurements, you’ll want to go to a local craft store or fabric store and purchase some heavy duty external use fabric. We recommend trying to find a color that matches your current awnings as closely as possible. Additionally, some manufacturers are even willing to sell small patch kits for their awnings which would be a perfect fit for both the color and material. Once you have the fabric, you’ll want to sew the path on the underside. Begin by stitching around the edges of the rectangle so that there is room on all sides of the tear. Once the rectangle patch is securely attached to the awning, then you will want to carefully stitch the edges of the gash to the newly attached fabric. These seem to need to be tightly attached so that no wind gets underneath the seam as this will lead to flapping and can quickly cause the entire patch to blow out. The entire replacement can cost less than $15 and should take no more than an hour.
How to repair torn awning PVC or acrylic material
This type of damage is less common than the fabric tears; however, it is more time consuming to repair. If the hole in the awning is less than eight inches you may be able to patch it; however, anything larger than that is likely just going to need to replaced with a completely new awning cover. For the smaller hopes, the first step is to find a suitable patching material which will need to be ordered from a specialty online retailer. The precise composition will vary depending on your manufacturer so they are a good place to start the search. If you are able to find a suitable patch, then you will want to stretch the torn cover over the patch and apply a nonwater-soluble glue. Once the glue is successfully applied, you will want to place the entire unit between two sheets of plywood that are securely clamped together for 24-48 hours to all the glue to try. When placing the material between the pieces of wood take great care that no excess glue seeps through the seams onto the wood. If this happens, it will create a nightmare to remove the wooden supports. Once the glue is successfully dry with the supports remove, we recommend coating both sides of the entire area with a waterproof sealant.How to repair a bent awning pole
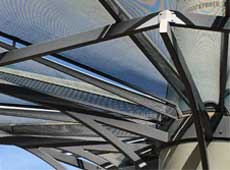
The metal supports of an awning can bend during heavy storms or if someone puts too much weight on them. These bends need to be treated seriously and fixed as soon as they are discovered because they can put the entire structural integrity of the awning at risk. The easiest method to repair a slightly bent arm is to find either a hitch if you are dealing with an RV or an outdoor chair with a sturdy metal frame, and then wedge the awning beam inside until the apex of the bend is next to the support bar of the hitch of a chair. Once it’s there then gently apply pressure so reverse the bend. You will need to take care the beam doesn’t rotate in your hand and go slowly so that you are able to stop should the bar break.
Does Awning Repair Tape work?
The short answer is “Yes’. The longer answer is that you need to get quality repair tape for awnings and apply it properly. There are two options depending on your budget. The absolute best option is made by Eternabond. This is strong enough to patch roofs on RVs or campers, and does marvelous on awnings for all fabric types. If you need a more budget friendly option, we use the Camco tape. This is considerably less expensive than the Eternabond product, but meets the needs to patch a hole in a residential awning. We’ve written an entire guide on how to apply tape to repair a hole in an awning if you need instructions on the process.Can you repair an RV awning?
Yes. Due to the vibrations and movements from the RV moving, the brackets can become loose. Both loose when they are connected to vehicle and when they attach to the fabric. You want to periodically check these just to keep them tight. It’s much easier to spend a few minutes tightening the bolts rather than waiting for them to fall off, and then needing to find a replacement. If you ever do lose one of the nuts, there’s a fairly easy way to replace it. You simply unscrew one of the other nuts and take it to a local hardware store who should be able to match it. If you lose both bolt and the nut, you have some flexibility. We still prefer trying to match it as closely as possible, but you also want to use the same or strong material. Bolts are load bearing so there’ not something that you want to cheap out on. Manufacturers understand the needs of their products so you’ll want to match or surpass the initial tensile strength.How do you fix a loose bracket?
This is a common issue, and thankfully it’s a super easy fix. You will normally want some pliers and a monkey wrench. You can put the pliers on the head of the bolt, and then use the monkey wrench to tighten the nut. You don’t want to over tighten the bracket that would strip the threading. If you can’t reach the head of the bolt, then you can still use the pliers on the thread side of the bolt to hold it in place. You just want to be cognizant that you’re not squeezing the pliers tight enough to damage the bolt.
Author:
Wilson Smythe
Date Published: 10/5/2016
Date Updated: 6/14/2018
Wilson Smythe
Date Published: 10/5/2016
Date Updated: 6/14/2018
.